Appearance
阿里云盘WebDav及挂载本地磁盘
阿里云盘挂载WebDav
要使用Aliyun网盘,首先要有一个网盘账号,具体的账号注册请到 阿里云网盘注册
获取RefreshToken
配置阿里云盘WebDav需要获取Refresh Toekn
- 使用Chrome打开 阿里云盘官网并登录
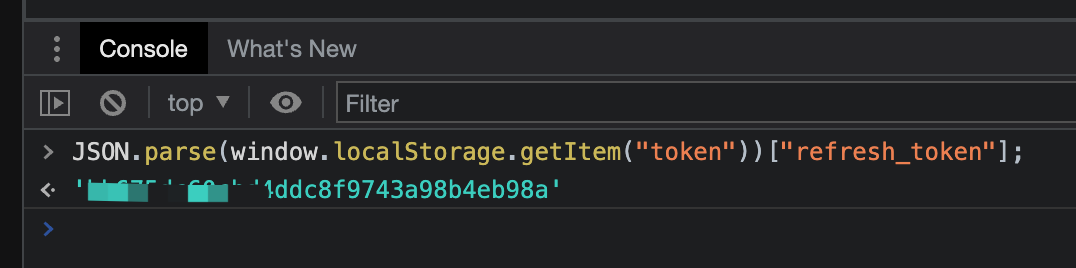
- 打开开发者工具,在
Console中输入jsJSON.parse(window.localStorage.getItem("token"))["refresh_token"]; - 输出的结果即是Refresh Token,复制以备用
使用Docker创建WebDAV
已经有大神将Docker镜像做好 messense/aliyundrive-webdav
创建一个存在配置文件的目录,比如/etc/aliyundrive-webdav/
然后使用如下命令运行docker
sh
docker run -d --name=aliyundrive-webdav --restart=unless-stopped -p 8080:8080 \
  -v /etc/aliyundrive-webdav/:/etc/aliyundrive-webdav/ \
  -e REFRESH_TOKEN='your refresh token' \
  -e WEBDAV_AUTH_USER=admin \
  -e WEBDAV_AUTH_PASSWORD=admin \
  messense/aliyundrive-webdav
注意端口号修改为你想要的端口,用户名和密码修改为你想要的密码。
至此阿里云盘的的WebDav服务就创建好,你可以在Kodi,Infuse或其他支持WebDav的软件中使用了。
将阿里云WebDAV挂载为本地磁盘
mumiehub/rclone-mount 是一个可以把一些常见的网盘服务挂载为本地磁盘的Docker镜像,也支持WebDAV挂载。详细的命令说明可以参考这里
在开始之前,我们要先创建两个目录,分别用于配置文件存放以及挂载
bash
mkdir -p /home/myname/aliyun/config
mkdir -p /home/myname/aliyun/disk
然后使用如下的命令运行docker
bash
docker run -d --name rclone-aliyun \
    --restart=unless-stopped \
    --cap-add SYS_ADMIN \
    --device /dev/fuse \
    --security-opt apparmor:unconfined \
    -e RemotePath="mediaefs:" \
    -e MountCommands="--allow-other --allow-non-empty" \
    -v /home/myname/aliyun/config:/config \
    -v /home/myname/aliyun/disk:/mnt/mediaefs:shared \
    mumiehub/rclone-mount
但是docker可能无法正确运行,因为我们还缺少最重要的配置文件。如果有另一台装有rclone的机器,建议使用这台机器上的rclone来创建配置。如果没有,我们也可以通过如下命令进行容器内部来创建
bash
docker exec -it rclone-aliyun sh
输入rclone config开始配置,输入n开始创建新的配置
bash
n) New remote
s) Set configuration password
q) Quit config
n/s/q> n
然后给你的配置起一个名字,这里我起的是aliyun
bash
name> aliyun
之后会出来网盘各类选择的界面,我们输入webdav
bash
Type of storage to configure.
Enter a string value. Press Enter for the default ("").
Choose a number from below, or type in your own value
 1 / 1Fichier
   \ "fichier"
 2 / Alias for an existing remote
   \ "alias"
 3 / Amazon Drive
   \ "amazon cloud drive"
 4 / Amazon S3 Compliant Storage Provider (AWS, Alibaba, Ceph, Digital Ocean, Dreamhost, IBM COS, Minio, Tencent COS, etc)
   \ "s3"
 5 / Backblaze B2
   \ "b2"
 6 / Box
   \ "box"
 7 / Cache a remote
   \ "cache"
 8 / Citrix Sharefile
   \ "sharefile"
 9 / Dropbox
   \ "dropbox"
10 / Encrypt/Decrypt a remote
   \ "crypt"
11 / FTP Connection
   \ "ftp"
12 / Google Cloud Storage (this is not Google Drive)
   \ "google cloud storage"
13 / Google Drive
   \ "drive"
14 / Google Photos
   \ "google photos"
15 / Hubic
   \ "hubic"
16 / In memory object storage system.
   \ "memory"
17 / Jottacloud
   \ "jottacloud"
18 / Koofr
   \ "koofr"
19 / Local Disk
   \ "local"
20 / Mail.ru Cloud
   \ "mailru"
21 / Microsoft Azure Blob Storage
   \ "azureblob"
22 / Microsoft OneDrive
   \ "onedrive"
23 / OpenDrive
   \ "opendrive"
24 / OpenStack Swift (Rackspace Cloud Files, Memset Memstore, OVH)
   \ "swift"
25 / Pcloud
   \ "pcloud"
26 / Put.io
   \ "putio"
27 / SSH/SFTP Connection
   \ "sftp"
28 / Sugarsync
   \ "sugarsync"
29 / Transparently chunk/split large files
   \ "chunker"
30 / Union merges the contents of several upstream fs
   \ "union"
31 / Webdav
   \ "webdav"
32 / Yandex Disk
   \ "yandex"
33 / http Connection
   \ "http"
34 / premiumize.me
   \ "premiumizeme"
35 / seafile
   \ "seafile"
Storage> webdav
然后我们需要输入我们的WebDAV服务地址,即我们刚才创建webdav服务器所在的地址和端口,比如我这里输入的是http://192.168.1.222:8180
bash
URL of http host to connect to
Enter a string value. Press Enter for the default ("").
Choose a number from below, or type in your own value
 1 / Connect to example.com
   \ "https://example.com"
url> http://192.168.1.222:8180
输入选择我们服务商的类型,这里我们选择other
bash
Name of the Webdav site/service/software you are using
Enter a string value. Press Enter for the default ("").
Choose a number from below, or type in your own value
 1 / Nextcloud
   \ "nextcloud"
 2 / Owncloud
   \ "owncloud"
 3 / Sharepoint
   \ "sharepoint"
 4 / Other site/service or software
   \ "other"
vendor> other
输入我们之前Webdav服务的用户名
bash
User name
Enter a string value. Press Enter for the default ("").
user> admin
选择使用我们自己的密码
bash
Password.
y) Yes type in my own password
g) Generate random password
n) No leave this optional password blank (default)
y/g/n> y
输入密码
bash
Enter the password:
password:
Confirm the password:
password:
创建bearer token,我这里输入的是123456
bash
Bearer token instead of user/pass (eg a Macaroon)
Enter a string value. Press Enter for the default ("").
bearer_token>123456
是否使用高级设置,我们不用,直接回车.即可看到我们配置好的内容
bash
Edit advanced config? (y/n)
y) Yes
n) No (default)
y/n>

Remote config
--------------------
[aliyun]
url = http://xxxxxxxx:8180
vendor = other
user = admin
pass = *** ENCRYPTED ***
bearer_token = 123456
然后检查一下我们的配置是否OK,如果没问题直接回车即可
bash
y) Yes this is OK (default)
e) Edit this remote
d) Delete this remote
y/e/d>
Current remotes:

Name                 Type
====                 ====
aliyun               webdav
然后输入q,退出配置
bash
e) Edit existing remote
n) New remote
d) Delete remote
r) Rename remote
c) Copy remote
s) Set configuration password
q) Quit config
e/n/d/r/c/s/q> q
至此我们就配置完了,如果你在其他机器上配置,记得将你的配置文件copy到之前我们创建的配置文件目录。 如果使用docker配置的,刚不需要修改。但我们需要将原来的容器删除,然后把RemotePath把我们的aliyun给填上,即我们要使用aliyun这个配置。重启运行即可
然后可以在宿主机上输入如下命令,查看是否已经正确挂载
bash
df -h